Views

Saturday, March 23, 2013

Shooting with the Sigma SD1 Merrill

     I get alot of questions asking, "What camera should I buy?" The person asking usually gives two cameras either Nikon or Canon. While Nikon and Canon are the main power houses in the DSLR world, I have been growing quite fond of Sigma. Sigma is mostly known for their lenses made for multiple mounts, but a few years ago the got into the DSLR business. Their biggest draw to their cameras? The Foveon Sensor. The foveon sensor captures all three colors per pixel, much like the emulsion layers on film. This allows for true color and less artifacts. The sensor design also eliminates the need for optical filters and a demosaicing process necessary in bayer pattern sensors.

A Foveon sensor vs a Bayer Pattern sensor.
Did you know that a typical sensor's photo sites are 50% green and only 25% red and 25% blue?
This is because the human eye is most sensitive to the color green.

Now on to the SD1. Sigma has released many DSLRs before and few were taken seriously by the normal market. But now Sigma has released a monster. The SD 1 Merrill is a 46mp (15.3x3) APS-C beast. By standard pixel definition it is 15.3mp but because of the Foveon's unique properties it has the equivalent resolution of a 30mp bayer pattern sensor.


I feel that I have been technical enough for this post, Now on to some samples...


Here is a shot I took at Imaging USA 2013 in Atlanta. Sigma had a booth with a full setup for anyone wanting to try out a lens or the SD1.

The scarf that Mackenzie has here would manifest some serious Moire with a normal sensor.
This was shot on a Sigma SD1 with a 24-70 f/2.8 as a JPEG high quality. The color is dead on and the image was razor sharp.

Here is an image from a less controlled environment. I shot this at The Birding and Photo Fest in Marineland, Fl


This image was captured in the Sigma RAW file format and processed using Sigma Pro Photo 5.5. Once again the color is spectacular. I boosted the colors here because it was high noon and the sun was washing out the saturation. The SD1 captured the proper colors and made it easy to boost them without making it look too fake.

If you want a full review on the SD1, I'd have to shoot with one longer first, but the time I had with it makes me seriously consider buying one.

D7100 Hands On

Yesterday (3-22-13) I was in Atlanta waiting on film to be developed when I decided to test out the new D7100. I went to my usual stomping grounds at Showcase Photo and Video. Here is a quick review of what I found.


Images Courtesy of Nikon                                                   


Unfortunately I did not have my own memory card so I could not share the images here.

The Nikon D7100 is a 24 mp DX sensor with no low pass filter. Nikon claims that after a certain pixel density the OLPF is no longer needed. For those who don't know the Optical Low Pass Filter prevents the appearance of Moire which is a form of aliasing that occurs when an bayer pattern sensor is used to capture fine fixed patterns. (Fabric usually causes moire patterns to manifest on high density sensors.)

This is the first thing I tested. I looked for a subject that would be the most likely candidate to manifest moire and snapped a few shots. No moire visible. Granted there was not too many objects that could cause moire in the store.

My next test was noise performance. The D7100 performed pretty well in my tests of low light, high ISO but noise was noticeable at ISO 3200 with standard factory settings. I believe it was because of 24 million + pixels on a 1.5 crop sensor. Still it wasn't overly present to make the image unusable. Makes my D300s look like course sand paper by comparison.

After this I went to video. Video performance was pretty good. The D7100 has full manual controls with a built in stereo mic right in front of the hot shoe. It does not, however, have manual aperture control in live view. I noticed a quirky habit of this camera while using the 18-105mm f/3.5-5.6 VR lens that is featured in the kit. When I set my aperture at 5.6, like I do on my D300s to prevent changing exposure while zooming, the aperture went from f/5.6 at 18mm to f/9 at 105mm. This is the only camera I have experienced this on. Perhaps this can be fixed by a firmware update, but it is annoying.
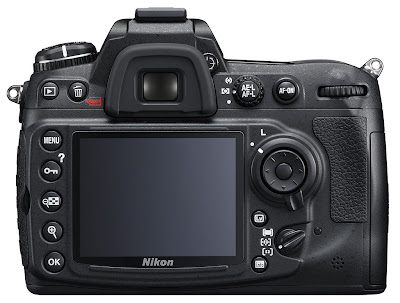


D7100 Rear Panel

A few other things I noticed during the test of this camera-

Auto focus was fast and accurate even in low light.

The shutter was remarkably quiet in normal modes.

The body was really light weight compared to my D300s - most likely caused by the camera being 50% plastic compared to magnesium alloy of the D300s.

Write speed was quick even on a class 4 SD card.

Image quality is superb.


Summary:

Pros-
  1. High resolution 24mp sensor
  2. No OLPF for increased sharpness
  3. Light weight body
  4. Fast AF
  5. Uses almost any Nikkor lens due to built in focus motor
  6. Full HD video with manual controls of image and sound
  7. Quiet shutter
  8. Two SDXC card slots U1 compatible
  9. Mic and Headphone jacks
  10. Weather sealed
  11. Price - Kit is less than the D300s body only
Cons-
  1. Not fully magnesium alloy like the D300
  2. No dedicated ISO, WB or ISO button (shared with other buttons)
  3. No LCD protector ( trust me its necessary)
  4. Full Auto Mode*
  5. Focus Mode Selector**
  6. No AF ON button***
  7. No dedicated metering mode dial.****
Overall the D7100 is a great camera that is capable  of producing breathtaking images in the right hands. Nikon is testing the water on some of these features and it seems to be working out. This would be a great upgrade for someone owning an entry level camera or a great back up to a D800 or D4.
The back of the D300s for comparison


* I believe that no pro camera should ever have a full auto mode. This is a recent trend in Nikon cameras, Starting with the D800, which should be stopped IMHO. I call this pro because NIKON claims this is the new DX flagship camera. (Unconfirmed reports say that Nikon Europe doesn't designate this as the flagship. D400 Maybe!?! )

** Focus mode selector is a push button on the AF/MF switch. I prefer the one on the D300s, pictured above, under the multi selector.

*** The AF On button is a real help when focusing in live view. Many pro-togs I know set it to be the only focusing mode to prevent others from using their cameras.

**** The metering mode dial allows me to switch from matrix metering to spot or center weighted with out even thinking. Having to press a button and rotate the command dial is annoying for me especially in quick shooting situations.

Monday, January 30, 2012

What did you say???

Yes... I use LOL Cats, it gets my point across.


As many of you may know, when technology and people meet, some pretty ignorant happenings will occur. Lets start out by saying everyone has those brain fart moments, okay, but when a person constantly defends a bad decision, it is hilariously annoying.

Question: What do you think of my photography?-please keep in mind I'm only 14 =)
thank you!

I spent some time looking over the typical teen shots that are over edited and toned to look "vintage." Many of which were just underexposed shots of trees with "artsy" titles like Light.

My Answer: Most of your images are over processed. Tone down the post processing and work on giving your images meaning. That is what differentiates a snapshot from a photograph.

Her Response: I would like to reply on your answer, since I don't think you're being fair at all. I shoot some of my images with filters, and very few of my pictures are edited, edited in a way of spot-healing and fixing the white balance. And as for 'giving my images meaning', that made me really sad. I shoot pictures of people I love with all my heart, of animals I visit every week in a zoo and play with, etc. I shoot those pictures with a lot of effort and with a lot of will. And that gives my photos all the meaning in the world they need. They mean a lot to me and I would cry every day for the rest of my life if I lost them.
So, have a good day, sir :)


My Reply:  No young lady the fact that all your pictures have added vignettes and added contrast from lightroom 3.3 means they are indeed edited. If fact, I do believe that since I posted this, you have went through and deleted the EXIF data on most of your Flickr images to hide the fact that I have pointed out that you are, indeed, a fraud. You clearly have no idea how to use a camera other that point lens, press button.


Yours Truly,
Freeman.
PS- I couldn't care less about your age, it is a sign of a bad photographer to blame anything but themselves for the way their images turn out. 
Here's a little hint, don't ask a question if you can handle the answer.

Saturday, November 19, 2011

Aesthetics

Aesthetic can be defined as pleasing in appearance. A photographer should strive to capture an image that should visually please the viewer. Something that will make the viewer want to stay in that image.


Okay, so this blog is going to be more of a rant from me...or opinion on what I believe to be aesthetically pleasing.


First of all, I do not find high contrast, high key portraits (especially outdoor ones) to be pleasing. The burned out highlights make the photographer look amateurish. I know people go for that look but please, limit it. I don't want my eyes to be burned by the blown out highlights in your images.
I find low key images to be more pleasing. The subtle lighting and controlled highlights can make an image pop. It is a great tool to control the viewer's attention as well.


They eye usually goes to the brightest to the darkest part of an image.

Low key images can give a sense of drama as well. We've all seen the interrogation rooms on TV cop shows, with the dark room and single light.


A window light portrait exposed for dramatic lighting.
I have noticed alot of photographers that crank the contrast and saturation on their cameras. First thing that comes to my mind as for why someone would do this is to imitate the super saturation of Velvia. Now I admit I've been guilty of this too. Heck there is even a picture control I made for my camera called Velvia. So I can't complain about that. What I can grip about is the tendency of people to destroy a good sunrise/sunset with over cranking contrast and saturation.

Keep it natural, its more appealing that way.

  
More to come...

Tuesday, October 18, 2011

Basic Flash Photography Part 1


Basic Flash Pt1 from Cory Shannon on Vimeo.

      Photography means drawing or painting with light. Therefore, what one can take from this is that photography needs light. But what do we do when the light is beautiful but not cooperating? We add our own that we can control. Yes its that little bulb on the camera called the flash. Fill flash and slow synch flash are the two most misunderstood aspects of flash photography. Misunderstood meaning almost never used by beginners except in auto modes when the camera tells us they are needed. Any camera with a flash can use these techniques and create amazing images with just the on camera flash and some know how.

 This image was taken at 7:39 pm. The sun was far enough below the horizon that it needed a 4 second shutter speed. Kelly here was illuminated by a SB-600 zoomed to 50mm. The aperture was set to f/4 and the lens set wide at 18mm.

Here's a little assignment, next time you are at the beach or in the mountains with the sun rising or setting, try these techniques for yourself. Then try them in other settings such as indoors.


More on the way!

Wednesday, August 3, 2011

Portrait Personality

            Any one that shoots portraits knows that getting the natural look of a person is hard to do. People tend to freeze up around a camera, or, as we have been taught since we were little, put on a fake smile. So, How does one make a portrait look more natural?

            There are a few ways of relieving the tension between the subject and photographer.
First and foremost, is be a human yourself. Talk to them. If you fall silent behind the camera, the subject's mind will wander causing them to become nervous. Simple conversation relaxes the subject and leads to a natural expression. As Joe McNally stated, the most important tool in your bag is your attitude.

              Candid shots capture people at there most natural state. Now there is a point in which candid pictures can go to far, Make people aware of your presence first. As time goes on they will go back to their own doings, ignoring you.

Mother and Son having fun at the beach.
 These two were in their own world, and it shows in their expressions even though you can not see the child's face.


              A good starting exercise for any beginner that wants to get into portraits is to practice with a friend. This makes it easier for both of you. Conversation is easier between the two of you and a friend is more likely to trust you than some compete stranger. This will allow you to be more open and creative.

This is one of the few of my images where photoshop was involved. It was planned from the beginning.


More to come....

Thursday, July 28, 2011

When The Sun Goes Down...

       Why are digital photographers afraid of the dark?

 We can blame our biological clocks saying its time to sleep, or we can say its just a habit. Regardless, digital cameras have opened up a world that has remained hidden from us, or one that we hide from. What is it that turns the photographer away at night? Is it noise? Come on, why be afraid of a little noise?

     One of my favorite times to shoot images is from dusk to dawn. Why? Well the main reason is there are less distractions during the late night. Most people are in bed and the natural ambient light takes on a calming blue quality. Its amazing how different the world looks through a long exposure.

      Many photographers pack up and head home when the sun goes down. Why? For night time shots all you need is a steady tripod and some imagination. Take the picture above, a 15 second exposure at ISO 125 f/4.5 @ 165mm no flash. Sure there is some blur but have you tried holding yourself completely still for 15 seconds? This image is impossible to record on film due to reciprocity failure. Digital sensors make it possible to capture high quality images when our eyes can barely see what is in front of us.

     Any one walking by this house in the day time would say its just a big house. But at night, The ambient lighting turns "just a big house" into an eerie sight! Your eyes wouldn't see this. This took 20 seconds @ ISO 100 to bring the character out of the night. Do you see any noise? 

1..2.. Freddy's coming for you!
    50mm f/8 @ ISO 200 30sec.

         Still very high quality and virtually no noise! So try this, go to your favorite spot to photograph, take a few shots in the day, then, if the law allows, go back at night and shoot some more. See how much it changes just between day and night.


         Here are some tips to get maximum sharpness in low lighting situations:

  1. Shoot on a tripod ~ duh!
  2.  Use the self timer to prevent bumping the camera during exposure.
  3. If your camera has a mirror up or delayed exposure mode use it to prevent the shutter from shaking the camera.
  4. Get a remote release. Some remotes have timers to allow for shutter speeds much longer than the longest speed programed into your camera.
  5. Bring a light to help manually focus your lens. Auto focus goes out the window after dark. Except during a full moon.
Speaking of full moons...
Here's an instance when shooting at night does not mean shooting in low light!

         So go out and explore the night time world that our eyes refuse to see! You may be surprised at what you reveal!